How to Create a Realistic Scribble Effect in Adobe Illustrator
In Illustrator there often many different ways to achieve a desired effect, in this case the desired effect will be a realistic looking hand drawn scribble effect, and I’ll discuss two different methods.
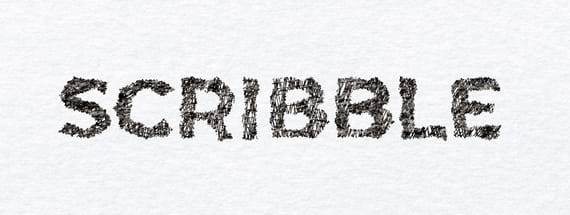
The first method to create this type of effect is to use Illustrator’s built in Scribble filter, it is quick and simple and features lots of options. This is also often to best solution, as it can be applied to more complex shapes.
The major downside to this effect is that it isn’t awfully convincing as hand drawn, even using lots of variance in the settings for your filter. It really would be quite unusual for a human to scribble so, for want of a better word, ‘perfectly’.
In real the real world, we would usually scribble in various different directions and maybe even rotate the paper a few times to get the best angle, we would also overlap some areas more than others creating an uneven density.
Through pure experimentation in Illustrator, I recently stumbled upon an unconventional method for a achieving a more realistic scribble effect. This second method involves using the blend tool, roughen filter, image trace and a bit of manual adjustment
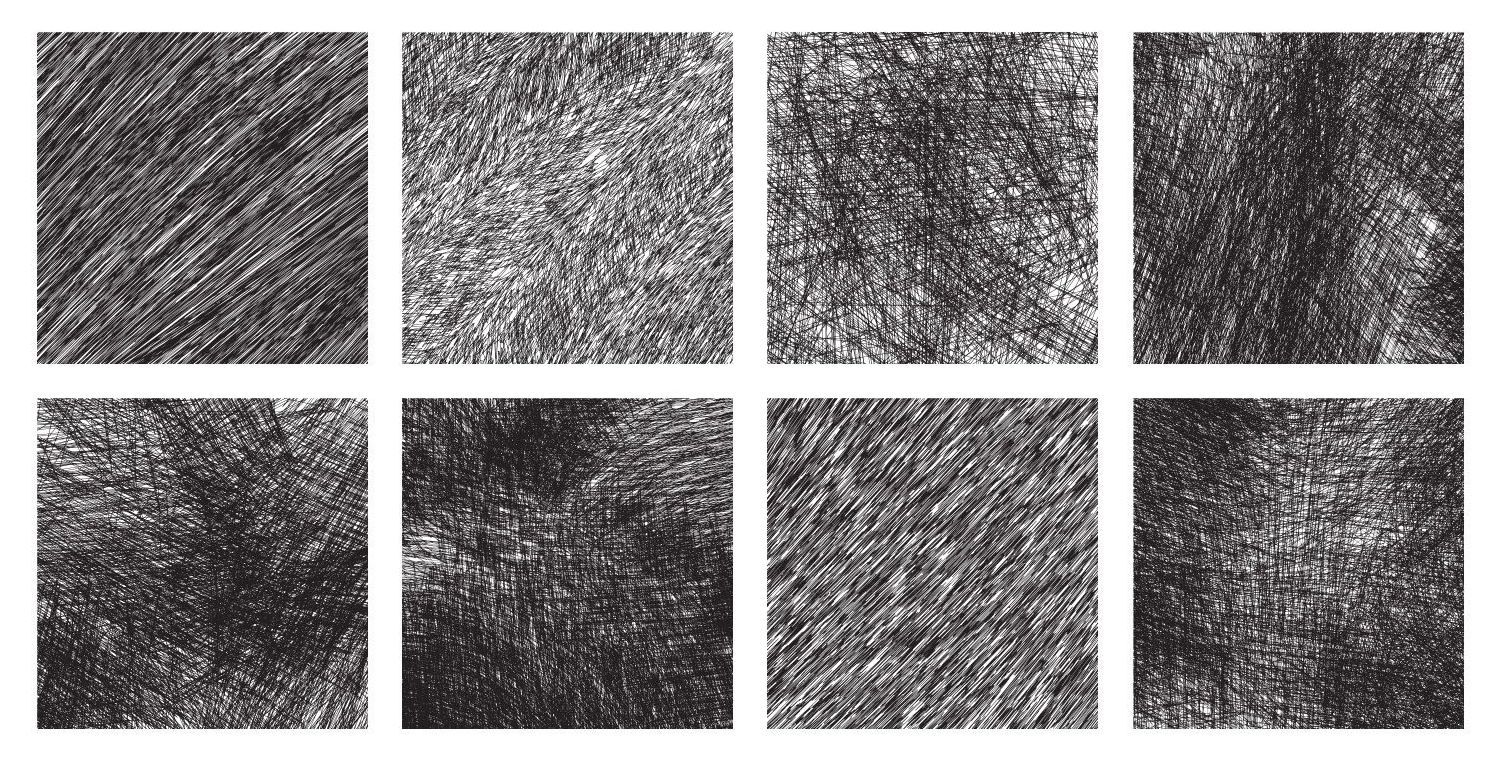
Download Vector Scribble Textures
If you want to skip the tutorial and download some pre-made vector scribble textures in Illustrator and EPS format, here's the link.
Step 1
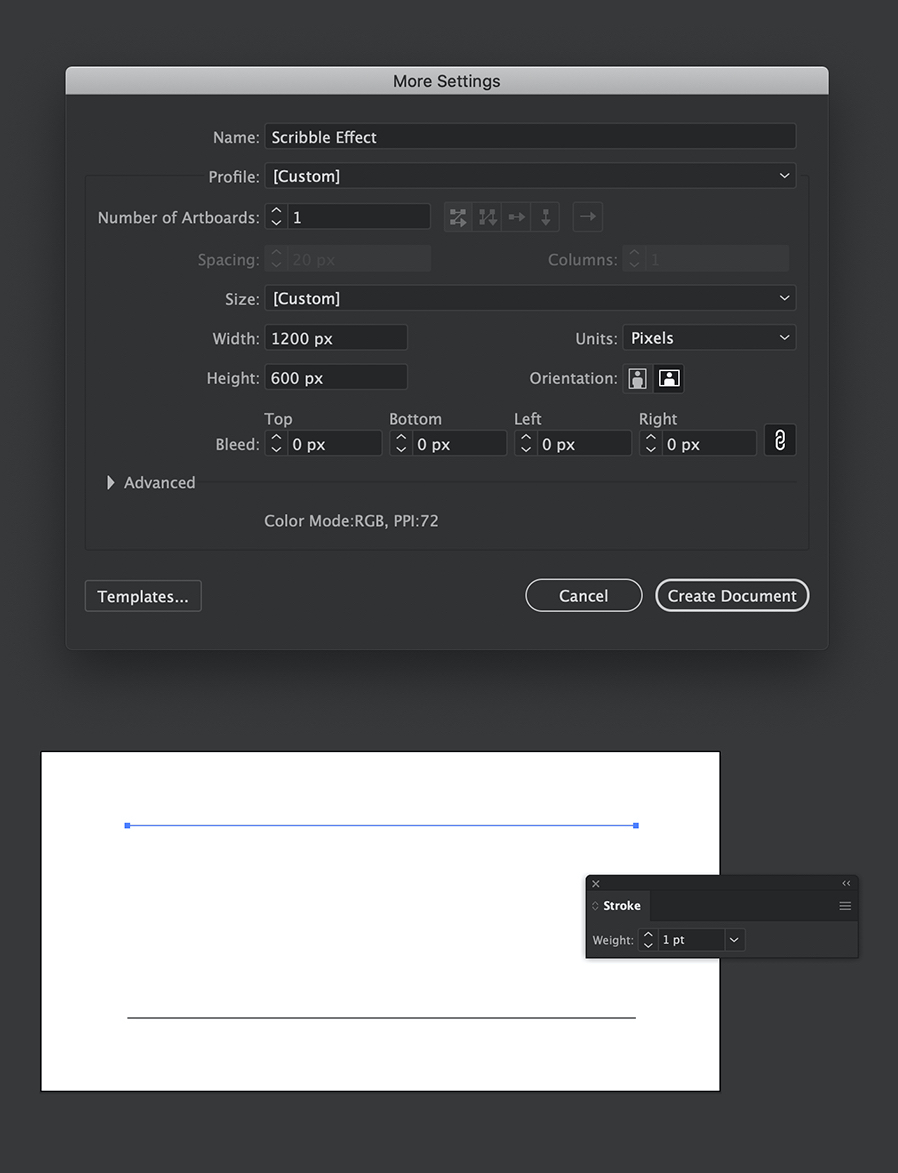
Create a new document in Illustrator, 1200 x 600 Pixels.
The technique that we are going to use is very resource heavy, unless you have a top end machine I wouldn't recommend going much higher resolution than this, as Illustrator will become very slow.
In your new document, draw two straight lines roughly 900 Pixels each with a 1 Pixel Black Stroke (no fill).
Step 2
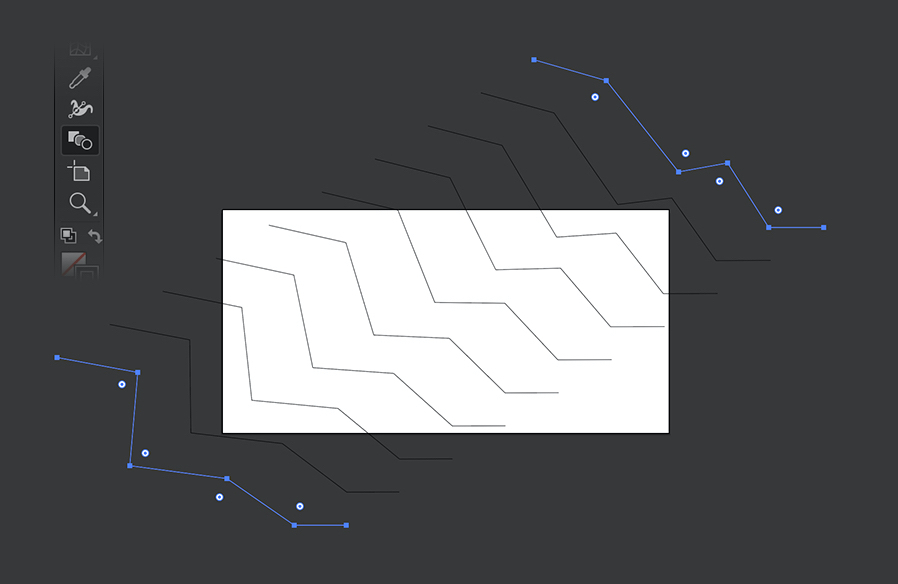
Rotate each of the lines roughly 30 degrees and place them off canvas on opposite corners to each other.

Step 3
Using the Pen Tool add 3-5 extra points to the lines.
Using the Direct Selection Tool, move the new points around a bit to create an almost zig zag like pattern.

Step 4
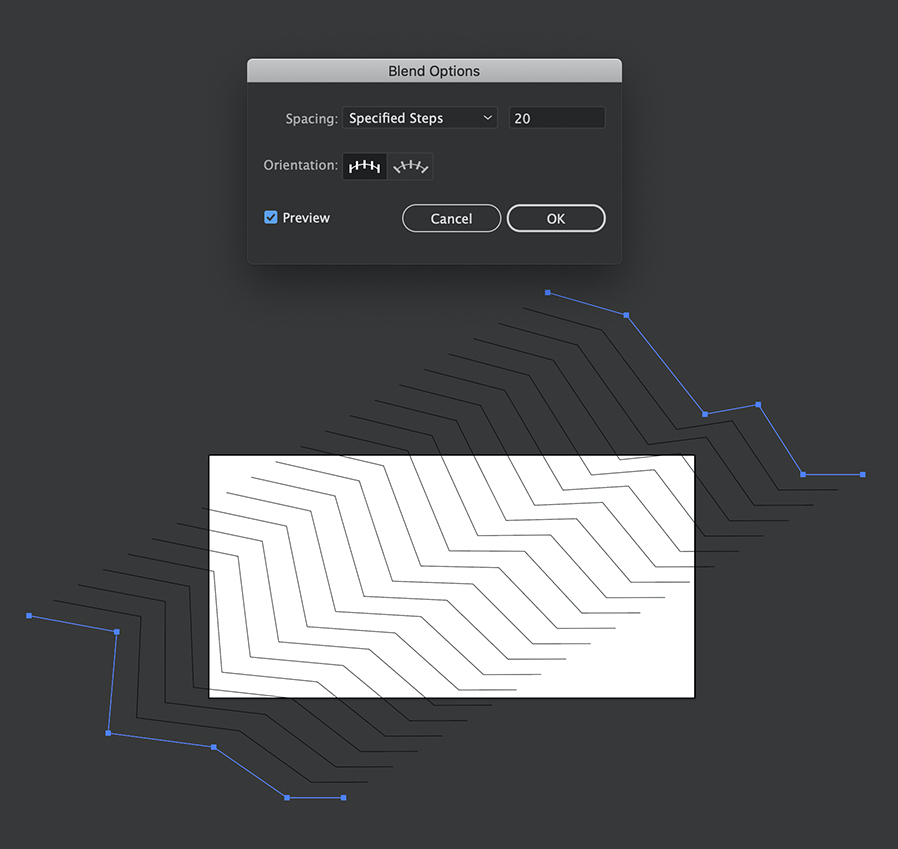
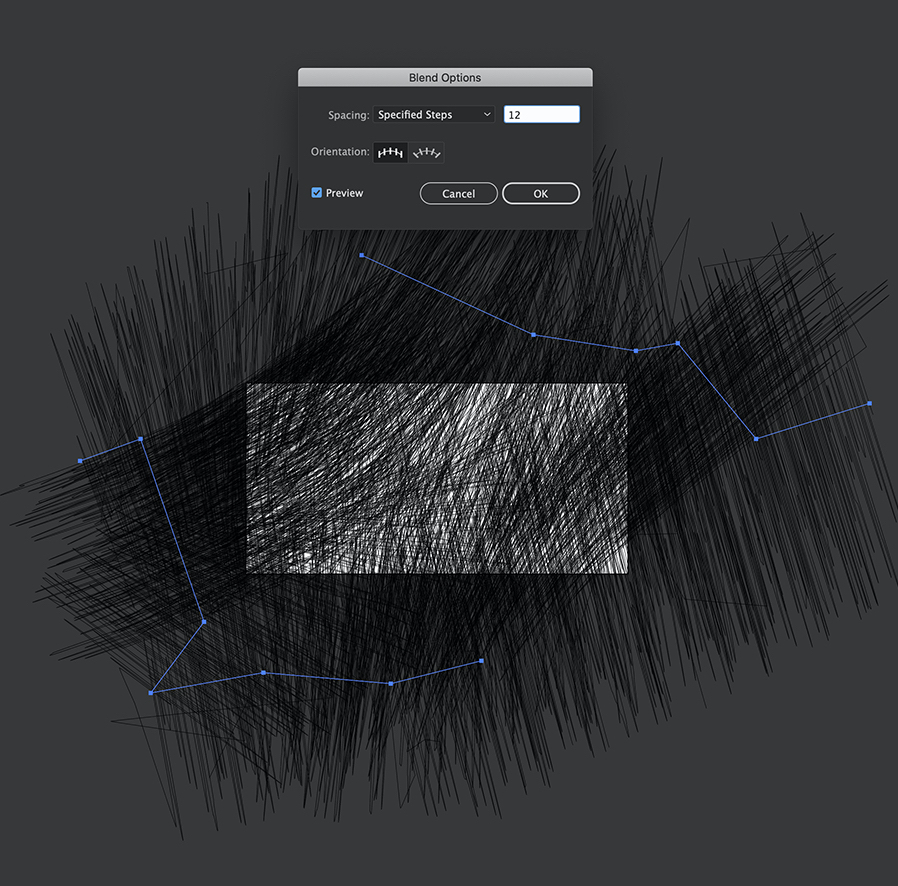
Using the Blend Tool, click on one of the paths and then whilst holding down the Shift key, click the other path.
This will join the paths together and create a series of copies between them as they transform.
Hit the Enter/Return key to bring up the Blend Options dialog.
Set the options to Specified Steps and enter 20.
Step 5
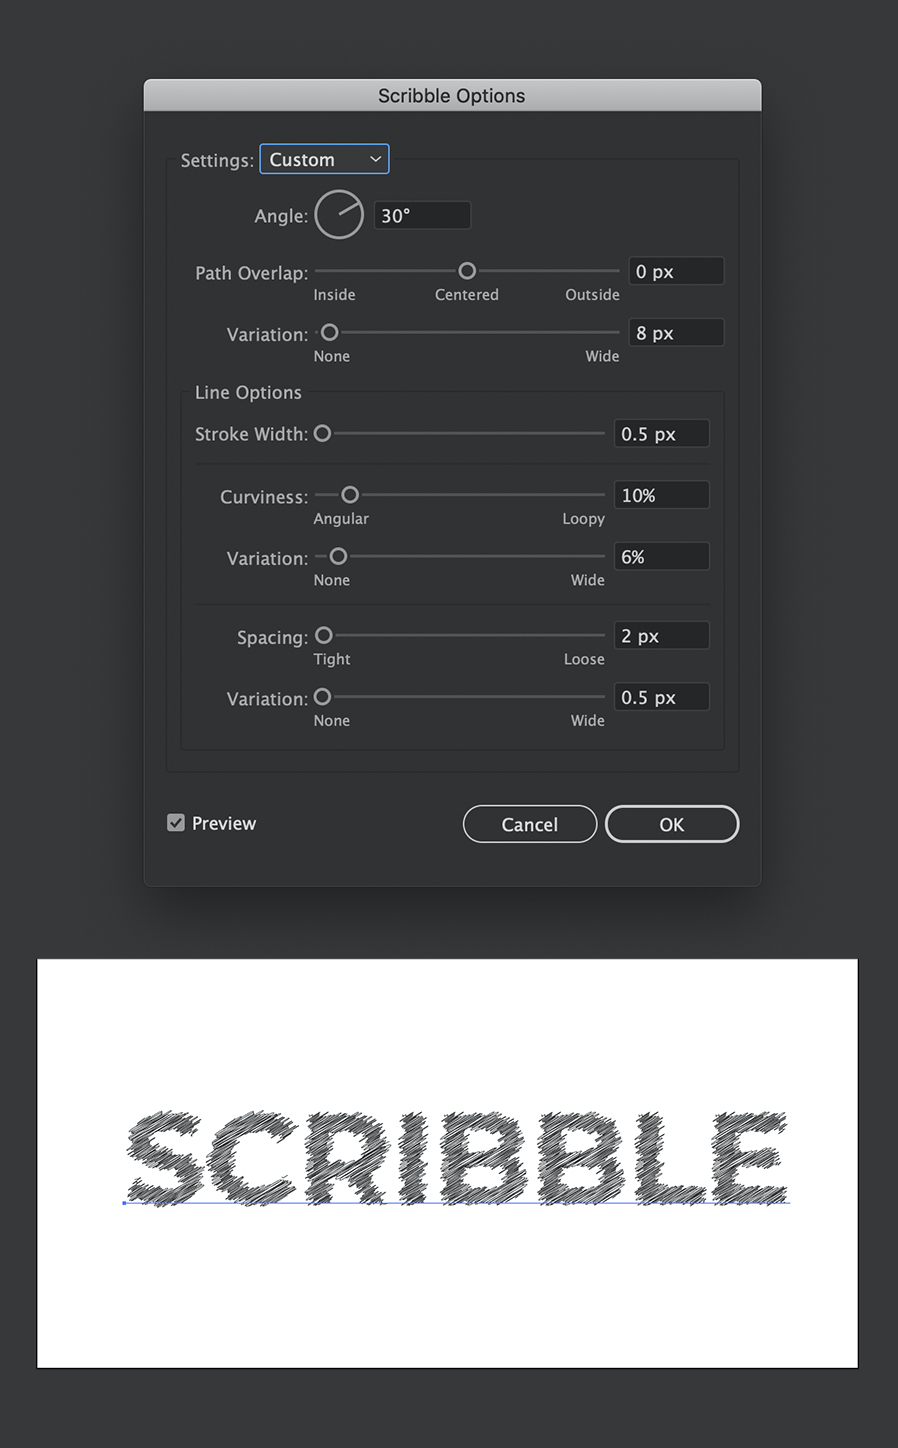
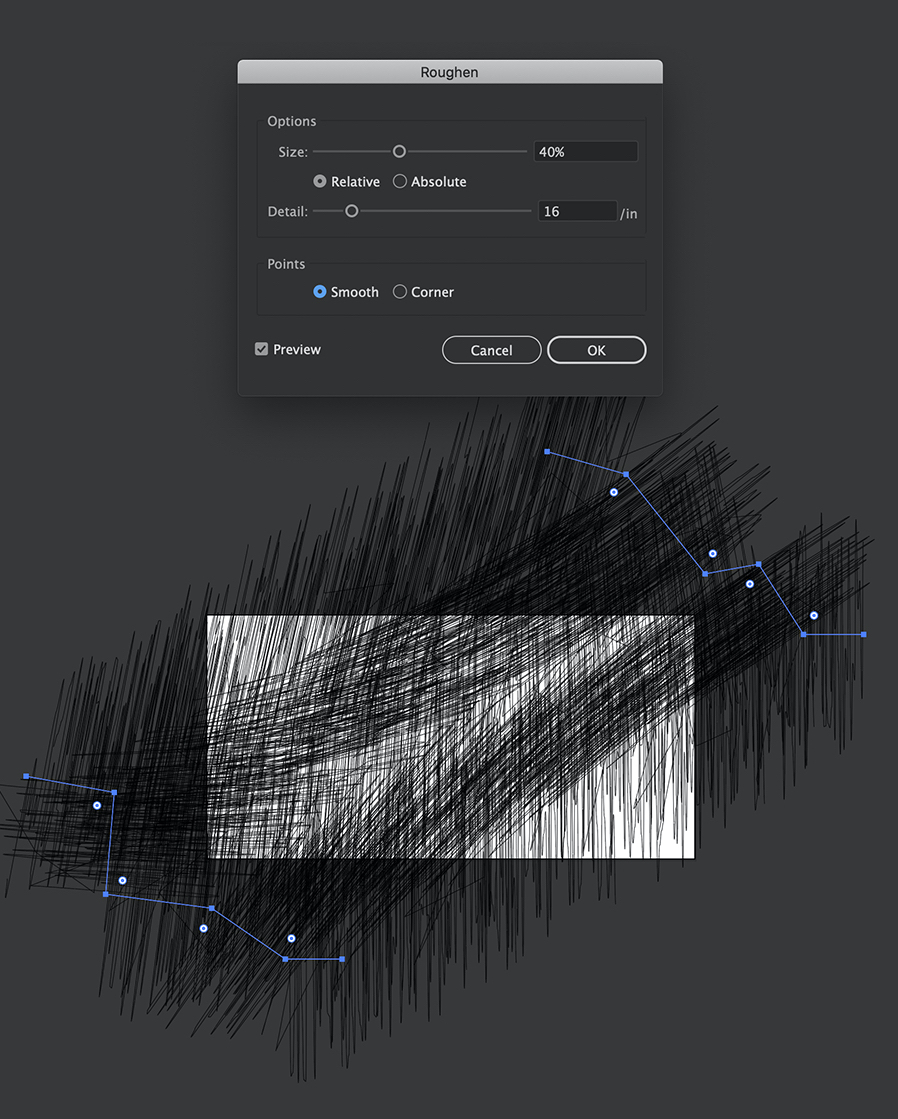
Go to Filter > Distort > Roughen and enter the following options:
- Size: 40%
- Relative
- Detail: 16/in
- Points: Smooth
Step 6
Now, time to get creative.
Grab individual points of the paths and move them around, or add new points to experiment with. The results this will give you are slightly unpredictable, so the best advice I can give is to experiment until you find a result that you like (only what is on the canvas matters).
I added 1 new point, rearranged the paths slightly and reduced the Spacing to 12 steps in the Blend Options.
Step 7
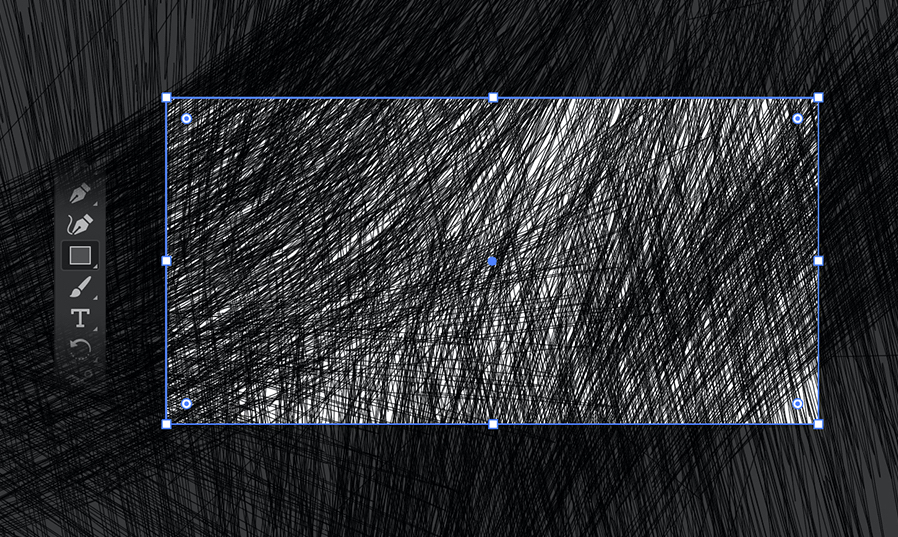
Use the Rectangle Tool to draw a 1200 x 600 Pixel rectangle that covers the canvas with no fill or stroke.
Highlight all objects in your document and hit CMD+7 or CTRL+7 to create a Clipping Mask.
Step 8
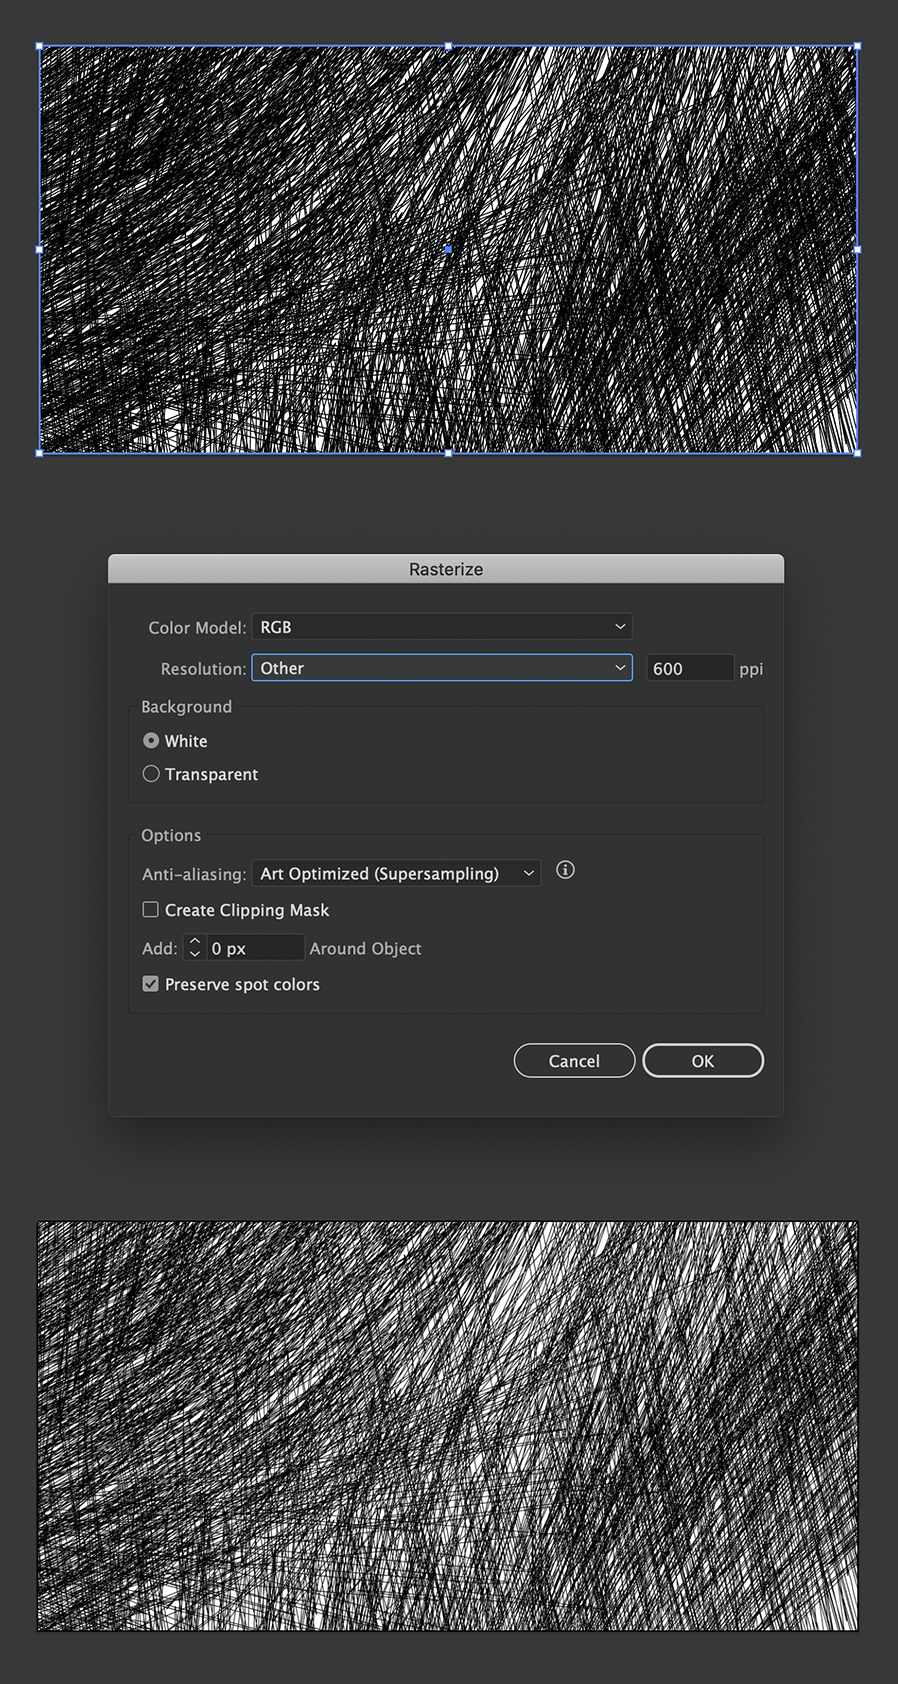
Go to Object > Rasterize and enter the following options:
- Color Model: RGB
- Resolution: Other
- 600 ppi
- Background: White
Step 9
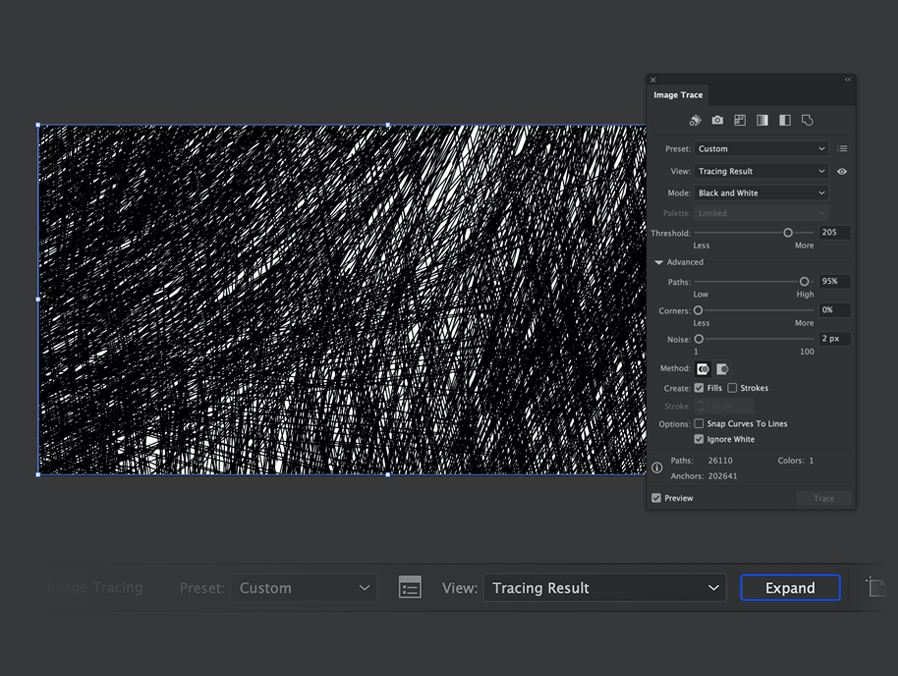
Highlight the now rasterised bitmap image and choose Image Trace.
Enter the following Options:
- Threshold:205
- Paths: 95%
- Corners: 0%
- Noise: 2px
- Method: Abutting
- Snap Curves To Lines: No
- Ignore White Space: Yes
Click Expand to confirm your trace.
Step 10
Go to Object > Pattern > Make and click Done.
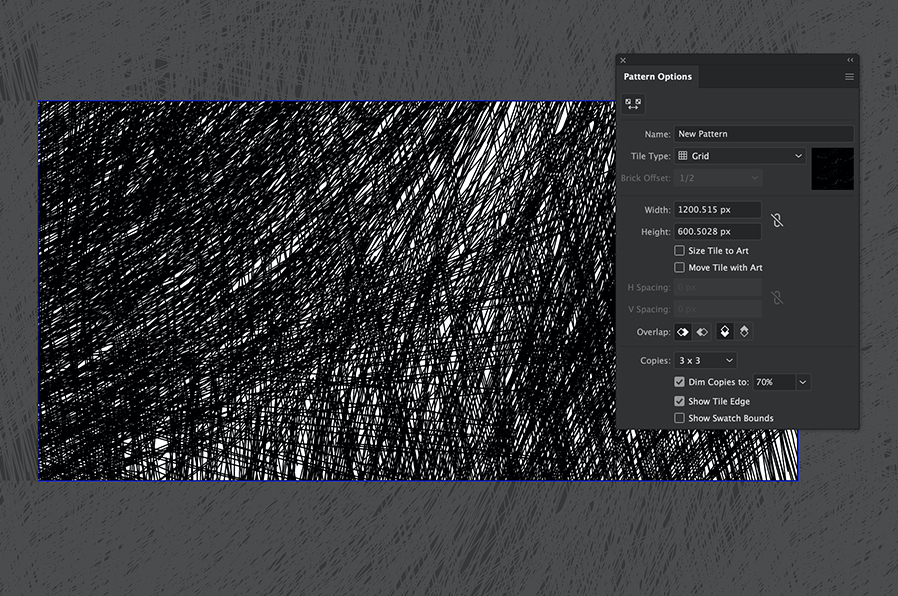
Step 11
Your can now type out some text, or grab a simple vector shape and https://we.graphics/item/vecto....
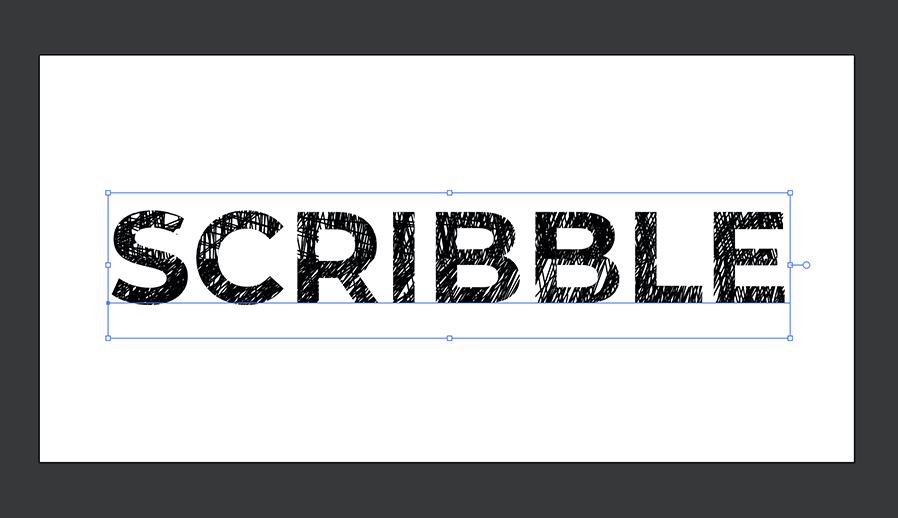
Step 12
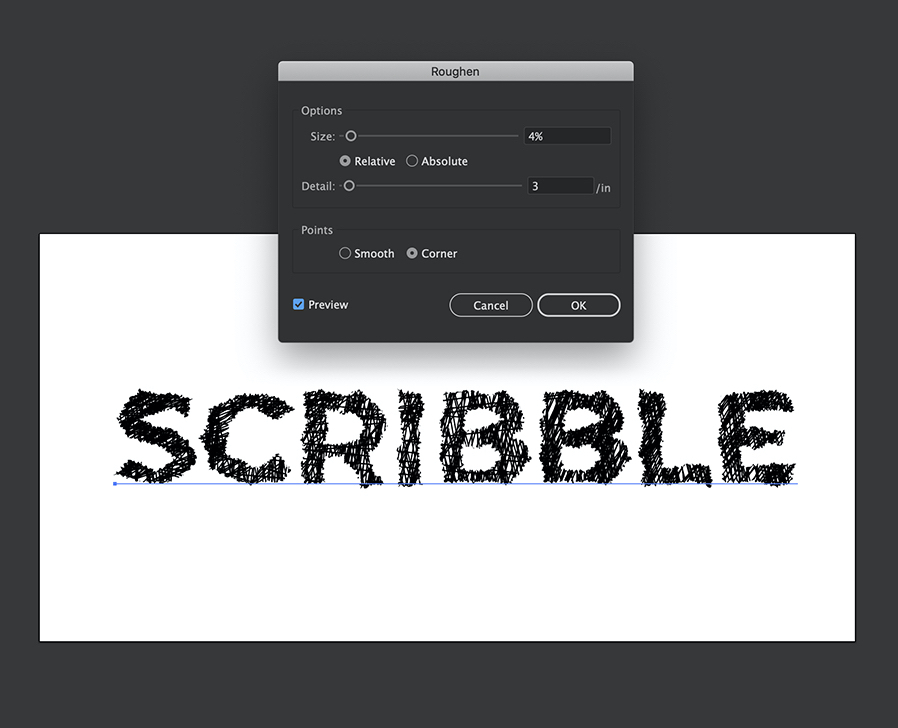
This can be made to look a little more convincing by adding a Roughen filter also to the text.
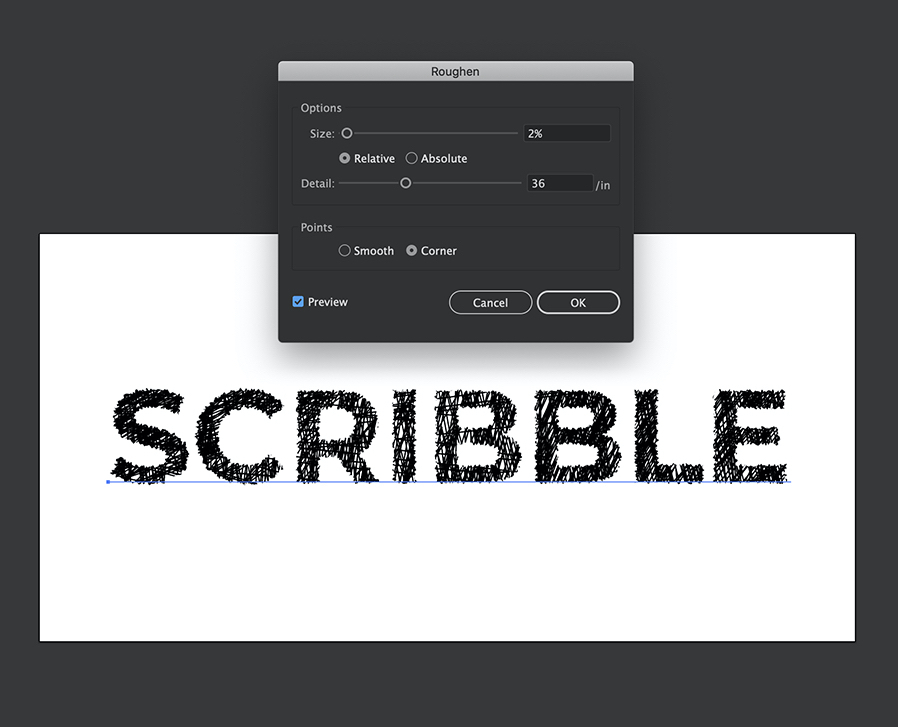
Make that two Roughen filters...
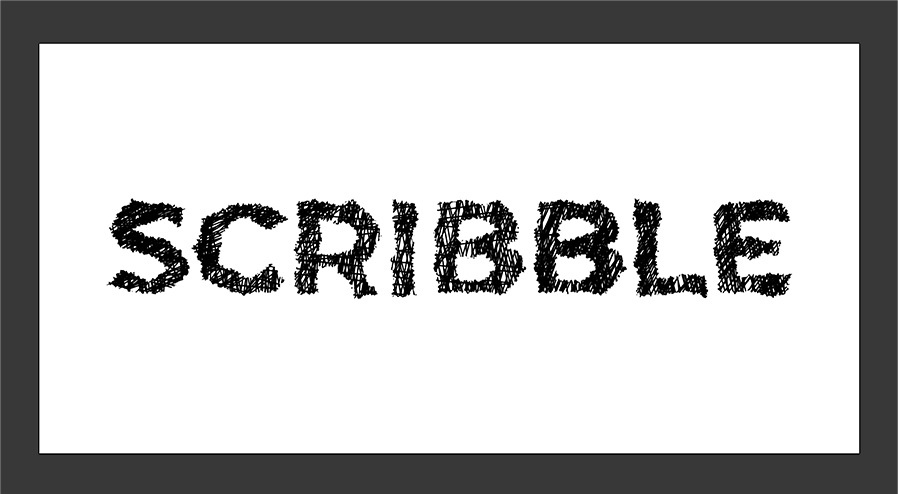
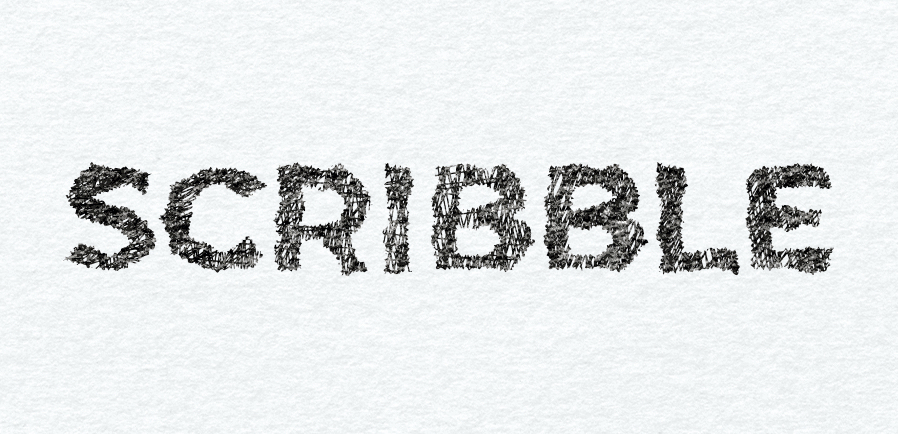
Result
Here is the final result. The text it's self isn't the most convincing hand drawn effect, but the pattern is much more human looking than the built in scribble filter that Adobe provides with Illustrator. Of course, both of these methods have their purposes, and one may be more suitable than the other in any given situation.

Just for fun, I also added some texture to the effect :)
More from Tutorials

How to Make Light Leaks From Images in Photoshop
Tutorialsby Diego Sanchez
Light leaks can instantly add warmth, depth, and a cinematic feel to your images, and creating them in Photoshop is much easier than you might think. In this tutorial, we’ll transform ordinary images into beautiful light leak overlays using just a few simple tools like Blur, Contrast adjustments, and the Liquify filter. By manipulating colors and shapes, you can craft soft gradients of light that bring a nostalgic, film-inspired atmosphere to your photos. Whether you want to enhance portraits, add flair to design projects, or create dreamy lighting effects, this method gives you full control over the final look in just a few minutes.
Read more
Enhance Autumn Colors in Lightroom with Ease
Tutorialsby Diego Sanchez
Enhancing the warm and vibrant tones of autumn photography is easier than it seems with just a few simple adjustments in Lightroom. By carefully refining exposure, boosting contrast, and enhancing the reds, oranges, and yellows, you can transform any fall image into a rich and captivating scene. Using only Lightroom’s basic tools along with the Color Mixer and Color Grading panels, you’ll bring out the full beauty of autumn landscapes with ease.
Read more
Easily Add a Twilight Mood to Your Photos in Lightroom
Tutorialsby Diego Sanchez
Give your photos a mystical touch by transforming ordinary daylight or sunset shots into captivating twilight scenes. By combining simple adjustments with precise tweaks in the Color Mixer, enhancing tones with Color Grading, and adding a delicate layer of Grain, it’s possible to achieve a soft, cinematic glow. These subtle yet impactful edits can shift the mood of your images, creating a serene, atmospheric look that feels like the perfect blue hour moment.
Read more
How to Create an Editable Soft Glow Text Effect in Illustrator
Tutorialsby Diego Sanchez
Creating eye-catching visual effects in Illustrator doesn’t always require complex tools or multiple layers. Sometimes, a single feature—used creatively—can deliver stunning results. Today, I’ll show you how to create a soft glow text effect using nothing but the Appearance Panel in Illustrator. Thanks to its non-destructive structure, you’ll be able to edit your text at any time without losing the effect, making it perfect for experimenting with different styles, colors, and typefaces without starting over.
Read more