Photoshop Quick Tip: Adding and Enhancing Light Rays in Your Photos
I love photographing light. You can get some really random and cool effects from aiming your lens at the sun. You can also create some really fun effects using filters in Photoshop. And sometimes these effects are so simple to achieve it almost feels like cheating. Lets take a look at one such effect... adding light rays to a photo.
To achieve this effect you need a good photo with a light source coming from behind a subject. I found this great photoof a girl jumping by Heather Aitken.

I chose this photo because the sun is setting in the background, and we have a good foreground subject for the light rays to wrap around. To start the process, lets switch over to the channels palette, and choose the channel with the most contrast.
In this case I felt the Red Channel contained the best contrast. So I duplicated that channel by dragging red layer to the "Create New Channel" icon.

Now we need to bump the contrast even more using Levels adjustment on the Red copy layer.

Now make a selection from this layer by (Cmd+Clicking) the Red copy layer's thumbnail on the Channels palette.

Now, with the selection still active, switch back over to the Layers panel and create a new layer. Then choose (Edit | Fill) and make sure "White" is selected for use.

You can deselect the white area now, and choose (Filter | Blur | Radial Blur) using the settings below.

This looks good, but lets take it a step further.

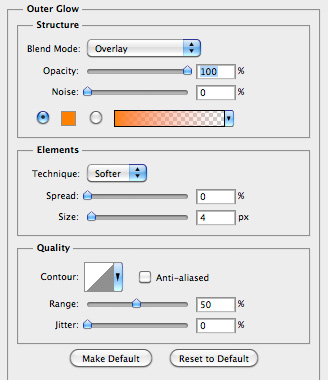
On the white light rays layer, add an Outer Glow layer style with the following settings.

That's it... We added some warmth to the light rays to match the original sunlight in the photo.


