
Photoshop For Beginners: 6 techniques to extract anything from its background
This is the second of a series of tutorials thought for Photoshop beginners. I'll explain in depth those features that can result difficult to understand for a newbie. Today I'll show you 6 techniques you can use to extract a person/object from its background. From now on extraction won't have secrets for you!
Extraction is one of the worst enemies for those who start using Photoshop. While it's simple to extract a geometric figure from its background, it is difficult to do the same with a tree or a blonde flowing hair model. There is not a unique approach to this topic, but several techniques in according with the nature of the object to be extracted. Here are 7 extraction techniques that will allow you to isolate and extract almost anything.
Do you want to learn Photoshop basics with simple yet effective tutorials? Don't lose any article of this series. Subscribe" class="redactor-linkify-object">http://feeds.feedburner.com/we... to our RSS or follow" class="redactor-linkify-object">http://twitter.com/wegraphics"... us on Twitter!
How to:
- Extract simple form objects
- Extract a person
- Extract dark objects from white backgrounds
- Extract clouds and flames
- Extract hair using channels
- Extract furry animals
- Powerful extraction plugins
Before we start: in the following exercises I take for grant you'll unlock the background layer when you open a new image in Photoshop before start the exercise. To unlock the background layer double click on it in the layers window (generally placed in the bottom-right) and hit ok in the window that appears.
For mac users: alt=options. ctrl=cmd.
Exercise 1: How to extract simple form objects
Objects with simple forms are easy to be extracted. Let's suppose we want to remove this screw head from its background.
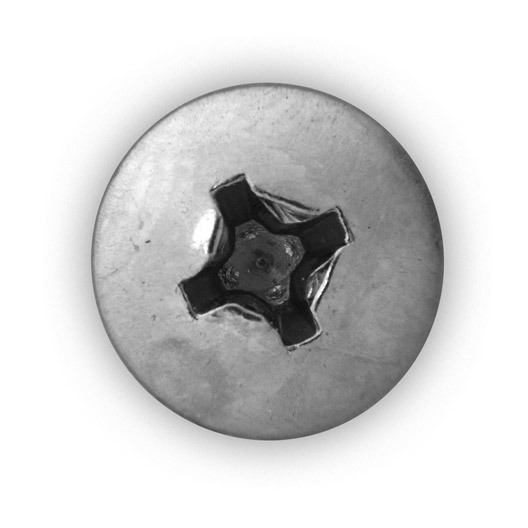
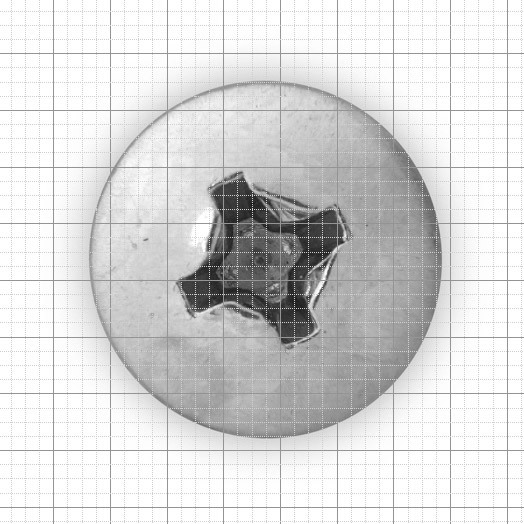
Open the screw image in Photoshop. Grab the Elliptical Marquee Tool from the tool bar on the left. Since the form of the object to extract is a circle, we will use a circle selection to extract it. But before start using the selection tool we need to highlight the center of the screw. Photoshop grid can help us. Go to view>Show>Grid
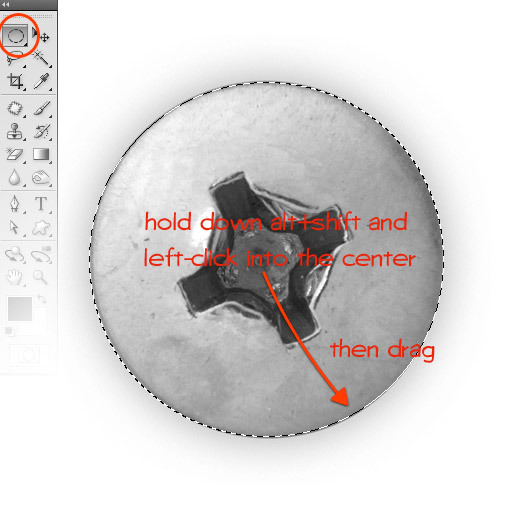
Now that it's easier to find the center of the screw head, grab the elliptical marquee tool, hold down alt and shift, left click on the center of the screw and drag until you select the entire object.
Why to press shift? Shift key is often used in Photoshop to maintain constant proportions. If you want to re-size an object without modifying its proportions, you have to press shift while resizing it. In this case if you want a circle you have to pres shift, while you don't have to press shift in case you want an ellipse.
Why to press alt? In this way the first click coincides with the center of the circle. Instead if you don't hold down "Alt", the first click coincides with a point of the circumference.
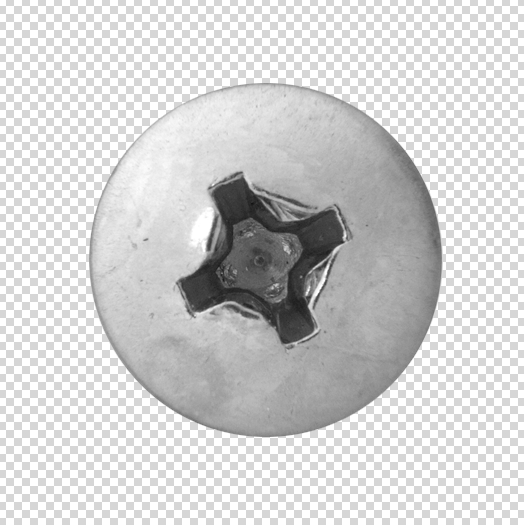
Once you have your screw selected, inverse the selection by going to Select>Inverse (or press shift+ctrl+I) and hit delete. You have so removed the background.
Note: in case you don't see the transparent background, but still a white background, it means you haven't unlocked the background layer. When you open an image in Photoshop this image is by default locked. To unlock it double click on the image layer (into the layer window - bottom right) and hit ok in the window that appears.
Note 2: If you want to save an image with a transparent background, you have to choose .png format.
Now that you have your screw extracted, you can use it for your compositions, as I did in this type" class="redactor-linkify-object">https://wegraphics.net/tutoria... treatment tutorial:
But what if you have to extract an object with a simple yet irregular form? In this case you have to use the Pen tool. The pen tool allows you to create any kind of form and selection. Select this tool from the tool bar and set it in "paths mode". We will use the pen to extract an apple.
Don't you know how the pen tool work? Take a look at the" class="redactor-linkify-object">https://wegraphics.net/tutoria... first tutorial for this matter.
Use the pen tool to trace the outline of the apple:
Once you've finished, press ctrl+enter to activate the selection tool, shift+ctrl+I to inverse the selection and finally hit delete.
Exercise 2: How to extract a person
To extract a person is less simple then to isolate an apple. For this exercise I'm going to use this image of a model.
What is the best tool to extract this beautiful girl? The pen tool. What's the difference with the previous exercise? You shall be moooooore patient because you need moooore anchor points. Grab the pen tool and zoom on the image. The more you zoom, more precisely will be your selection. Then start tracing the outline of the girl as in the previous exercise with the apple.
Tip: press alt+scroll the mouse wheel to zoom in/out
Once you've traced the outline of the model, use the pen tool in "substract area mode" to trace those inner parts that shall be removed.
Here is the path at the end of the process:
As in the previous exercise, press ctrl+enter to activate the selection. But in order to make our selection more precise (persons edges are more complex than apple ones), with the selection still active press the "refine edge" button in the options bar. Refine Edge tool is very intuitive to use. You have different options to manage (radius, contrast, smooth etc) and the live preview of your selection. When you're satisfied hit ok.
The last step is to inverse selection (shift+ctrl+I) and hit delete to remove the background.
Exercise 3: How to extract dark objects from white backgrounds
For this exercise I'm going to use this image of a leaf. Notice the strong contrast between the leaf color and the white background. When you want to extract an object which strongly contrasts with its background color, the Extract Filter is the best choice.
This method is super easy. Go to Filter>Extract. The leaf will appear into a new window. The first tool on the left, the "edger highlighter tool", shall be used to highlight the edges of the areas to be retained.
Note: In Photoshop CS3 extract filter is a default plugin. If you are using CS4 version, you can download it for free here if you are a mac user. Or here if you have Windows.
Use the Fill tool to fill the areas you want to retain
Click on preview to see if you've correctly extracted the leaf:
Use the cleanup tool and the edge touchup tool to refine your selection:
And here is the final result:
Exercise 4: How to extract clouds and flames
If you have always wondered how to extract clouds and flames from their backgrounds, the following exercise is for you. Download the image of a flame and open t in Photoshop.
Go to the channels window (Window>Channels). Here ctrl+click con the red channel. You should see a selection active on your image.
Why red channel? Choose the channel in according with the image. Channels having more contrasts will allow you to detect less pixels. Channels with less contrast will detect more pixels.
Now you can copy (ctrl+C) and paste (ctrl+V) your flames into another image, as I did in this" class="redactor-linkify-object">http://designinstruct.com/digi... tutorial written for DesignInstruct
Exercise 5: How to extract hair using channels
Hair extraction is one of the most difficult Photoshop exercises. I'm going to show you how to use channels to extract this" class="redactor-linkify-object">http://www.sxc.hu/photo/121000... girl's hair:
In the channels window (Window>Channels) you can see 4 channels: RGB, Red,Green and Blue. We need to work with the channel with the strongest contrast between model hair and white background. In this case the Blue channel. Duplicate it by dragging it to the "create new layer channel" button.
Now take in mind: black areas are the ones we want to retain, while white areas the ones we want to remove. The first thing to do is to increase a little bit contrasts using curves. Press ctrl+M to activate curves and make a kind of "S" as shown in the screenshot below:
Secondly use the pen tool to trace the outline of girl's arms and face:
Make sure to have black (#000000) as foreground color. Press ctrl+Enter to activate the selection and hit alt+delete to fill selection with black. Finally go to Select>Deselect (or press ctrl+D).
tip: Alt+delete: fill with foreground color. Ctrl+delete: fill using background color.
Our preparation to selection is almost complete. Remember: black areas will be selected while white ones removed. We still have to cover with black some white areas within hair. Select the brush tool (B), choose a soft mechanical brush (hardness 0%) and set blending mode to overlay. With this brush start painting the last white areas we want to remove.
Why blending mode to overlay? In this way we won't affect white background but only gray areas
The last step: increase again contrasts using levels. Press ctrl+L to activate level adjustment. Then move the left arrow to 20.
Ok we can see the end ;-). Ctrl+click on the blue copy channel to select black area. Then click on the RGB layer to return to our starting colored image. Inverse the selection and hit delete.
Let's verify if the method works well. Create a new layer below and fill it with green using the Paint Bucket Tool (G).
As you can notice, selection is good but not perfect. We have some white parts at the end of hair strands. How to eliminate them? Simply select the girl's layer and go to Layer>Matting>Remove white matting.
Here is the final result:
Exercise 6: How to extract furry animals
Have you ever desired to put a nice sweet rabbit into one of your works (maybe no...)? Anyway I'm going to explain how to extract furry animals from their background without losing a single fur. For this exercise I'll use this image of a bunny.
To extract hair/fur is not simple. But there is a trick I gonna show you. Grab the pen tool in paths mode and start tracing rabbit's outline. We will add fur later.
As we made in the previous tutorials, once we have created the path using the pen tool we can switch to the selection by pressing ctrl+Enter. Then inverse the selection (shift+ctrl+I) and hit delete.
The rabbit is too sharp without its fur. But we can create them using the Smudge tool. Firstly create a new layer and fill it with green so it won't be difficult to see bunny's fur.
Select rabbit's layer by clicking on it in the layers window. Grab the smudge tool and choose a soft 5px brush with hardness 0% and strength 80%.
With the smudge tool start painting from the rabbit edges to the outside as if you'd like to create its fur. For this step the best would be to do with a graphic tablet. Anyway you can obtain a nice result with your mouse too.
After lots of patience and brushes of different sizes and strength, here is the final result.
Extraction plugins
In case you need to extract complex objects like trees, or you want to preserve semi-transparencies, you could think to use a premium plugin. Don't forget that Photoshop possibilities can be extended with professional problems-solving plugins. Here are 3 plugins that can help you to extract intricate objects:
Topaz ReMask
"Topaz ReMask is specifically engineered to supercharge the masking and extraction workflow for photographers and designers within Photoshop. Other masking tools - both within Photoshop and other third party filters - require intricate brushing, sampling, and refining for a detailed mask. Topaz ReMask, on the other hand, does all the heavy lifting while requiring a minimum of user input."
Price:$69
Mask Pro 4
"For removing unwanted backgrounds, Mask Pro 4.1 is the Photoshop plugin recommended by Advanced Photoshop magazine. Mask Pro 4.1 allows you to cut out a subject from the background by assigning keep and drop colors and simply painting away the background."
Price: $159,95
Fluid Mask 3
"Fluid Mask 3 instantly shows key edges in an image and provides comprehensive easy to use tools that work with difficult to see edges and tricky areas like trees & latices."
Price: $149
More from Tutorials

How to Make Light Leaks From Images in Photoshop
Tutorialsby Diego Sanchez
Light leaks can instantly add warmth, depth, and a cinematic feel to your images, and creating them in Photoshop is much easier than you might think. In this tutorial, we’ll transform ordinary images into beautiful light leak overlays using just a few simple tools like Blur, Contrast adjustments, and the Liquify filter. By manipulating colors and shapes, you can craft soft gradients of light that bring a nostalgic, film-inspired atmosphere to your photos. Whether you want to enhance portraits, add flair to design projects, or create dreamy lighting effects, this method gives you full control over the final look in just a few minutes.
Read more
Enhance Autumn Colors in Lightroom with Ease
Tutorialsby Diego Sanchez
Enhancing the warm and vibrant tones of autumn photography is easier than it seems with just a few simple adjustments in Lightroom. By carefully refining exposure, boosting contrast, and enhancing the reds, oranges, and yellows, you can transform any fall image into a rich and captivating scene. Using only Lightroom’s basic tools along with the Color Mixer and Color Grading panels, you’ll bring out the full beauty of autumn landscapes with ease.
Read more
Easily Add a Twilight Mood to Your Photos in Lightroom
Tutorialsby Diego Sanchez
Give your photos a mystical touch by transforming ordinary daylight or sunset shots into captivating twilight scenes. By combining simple adjustments with precise tweaks in the Color Mixer, enhancing tones with Color Grading, and adding a delicate layer of Grain, it’s possible to achieve a soft, cinematic glow. These subtle yet impactful edits can shift the mood of your images, creating a serene, atmospheric look that feels like the perfect blue hour moment.
Read more
How to Create an Editable Soft Glow Text Effect in Illustrator
Tutorialsby Diego Sanchez
Creating eye-catching visual effects in Illustrator doesn’t always require complex tools or multiple layers. Sometimes, a single feature—used creatively—can deliver stunning results. Today, I’ll show you how to create a soft glow text effect using nothing but the Appearance Panel in Illustrator. Thanks to its non-destructive structure, you’ll be able to edit your text at any time without losing the effect, making it perfect for experimenting with different styles, colors, and typefaces without starting over.
Read more