Illustrator Quick Tip: Adjusting Line Width with Stroke Profiles
I'm constantly in search of adding hand drawn touches to vector illustrations. I recently stumbled across stroke profiles, which are new to Illustrator CS5. Using stroke profiles you can instantly adjust line weight from think to thin, giving it a hand drawn calligraphy appearance.
Lets take a quick look at how to use stroke profiles. First, draw a curved line using the Spiral Tool. You can adjust the openness of the spiral by holding down the cmd key while you draw the spiral.
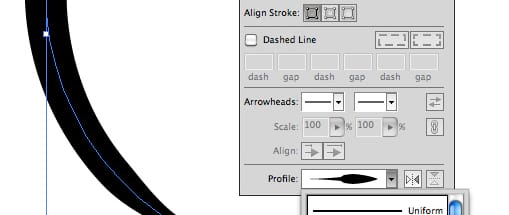
 Give the spiral a healthy stroke, maybe 3 or 4pt. Once your spiral is drawn, open the stroke panel (Window | Stroke). Notice at the bottom of the stroke panel there is a drop down labeled "Profile", and the default selection is "Uniform". With your line selected, try some of the different profile selections.
 Pretty quick and easy. In the past I always created custom brushes to achieve this look in my lines.
If you need further variation on your line weight, you can manually adjust the line using the Width Tool (Shift+W). Using this tool you can manually drag the line weight at any given point, or even add points.

 Once you've made adjustments to the line you can then save the line as a new stroke profile. Pretty amazing, right!?
 Try creating some of your own custom stroke profiles that fit your illustration style. Have fun and experiment!
 Give the spiral a healthy stroke, maybe 3 or 4pt. Once your spiral is drawn, open the stroke panel (Window | Stroke). Notice at the bottom of the stroke panel there is a drop down labeled "Profile", and the default selection is "Uniform". With your line selected, try some of the different profile selections.
 Pretty quick and easy. In the past I always created custom brushes to achieve this look in my lines.
If you need further variation on your line weight, you can manually adjust the line using the Width Tool (Shift+W). Using this tool you can manually drag the line weight at any given point, or even add points.

 Once you've made adjustments to the line you can then save the line as a new stroke profile. Pretty amazing, right!?
 Try creating some of your own custom stroke profiles that fit your illustration style. Have fun and experiment!


