Photoshop Mastery: 25 Techniques Every Designer Must Know
One of the best things about Photoshop is that you never stop learning. I've been working with the software for about 12 years, and I always stumble across something I didn't know, whether it be a new feature, or just a new, better way of doing something. There are countless tips and tricks to help boost your productivity and work flow some are obvious and easy to find while some you have to dig a little to seek them out. In this post I'm going to reveal 25 of the best advanced techniques to help you design faster and better within Adobe Photoshop.
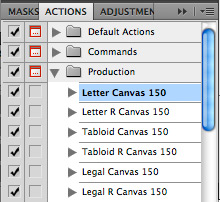
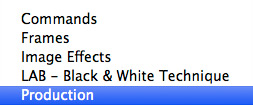 For example, notice the first action in the set. "Letter Canvas 150"? Creating an 8.5x11 canvas is something that you probably do often, and here is a handy little action to preform those steps for you to keep from having to do a receptive task over and over. The possibilities of actions are essentially endless.
 Creating Your Own Actions
It's simple to do so, just click the New Action icon at the bottom of the palette. Once the action is created, the record button will light, also at the bottom of the palette. From there Photoshop will record each function you preform until you press the stop button.
 For example: Let's say that you always convert you art to a size of 800x500 and add a water mark logo and save as a JPG for the web. This is something that you could easily record to an action and do with the click of a button.
 Photoshop also comes packed with several collections of tool presets. Just select the brush tool to see the presets for that tool. Load more by clicking the pull down menu from the presets panel.
 After clicking "OK" for the offset you can then remove the seam lines with the Clone Stamp [ S ] or the Healing Brush [ J ].
 To define the pattern click Edit | Define Pattern. The pattern will then be accessible from the Pattern Palette when you select the Paint Bucket Tool [ G ] or when you create a new Pattern Layer from the Layers Palette.

 Once you have a brush laid out, click Edit | Define Brush Preset.
 The brush will then be accessible from the brushes palette.
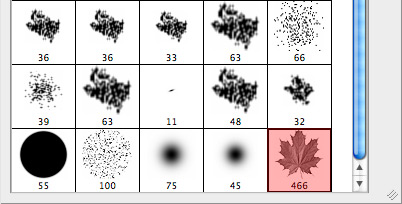 Custom brushes are a very fun tool. I encourage you to experiment and find a style of brush that you would find useful within your artwork.
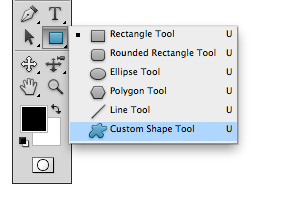 Shapes are loaded similar to patterns. There is a drop down in the top tool bar that show all of the shapes currently loaded.
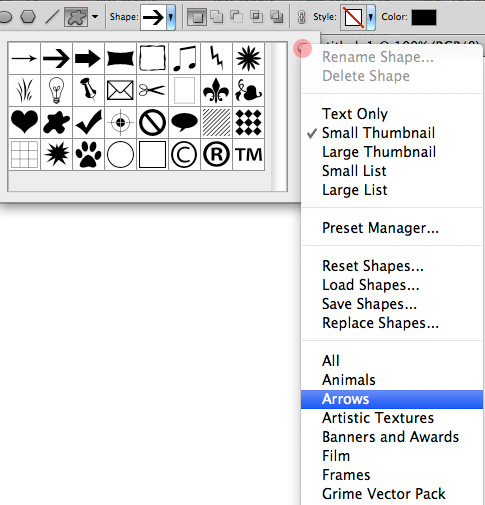 Photoshop comes with several collections of built in shapes. You can load these from the small arrow at the top of the Custom Shape drop down. Load some of the preset shapes and experiment.
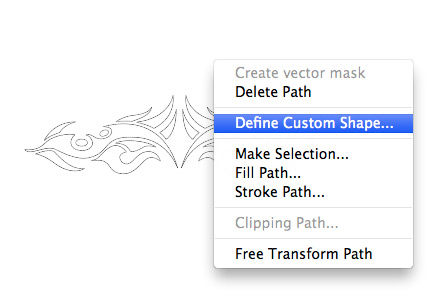 You can also create your own custom shapes from your vector files. Simply paste a vector from illustrator as a Path in Photoshop. Then with the Pen Tool [ P ] selected Ctrl + click on the Illustrator path and select Define Custom Shape from the drop down. Bam! Your shape now appears in the Custom Shape drop down menu in the top tool bar.
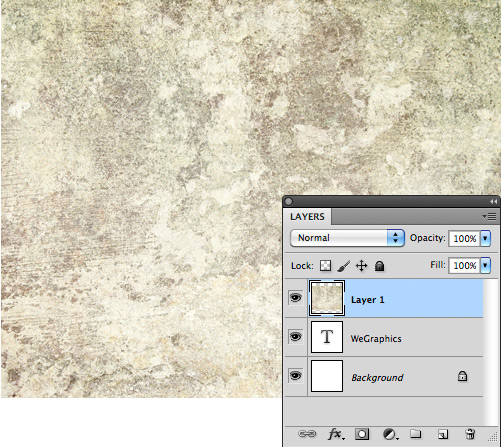 A good example is a text layer acting as the clip and a texture being set as the mask. The image is layered above the text and then set to a Layer Mask by [ Ctrl + clicking ] on the upper layer and choosing "Create Clipping Mask" from the pop menu. To release the mask [ Ctrl + Click ] the mask layer again and choose "Release Clipping Mask".
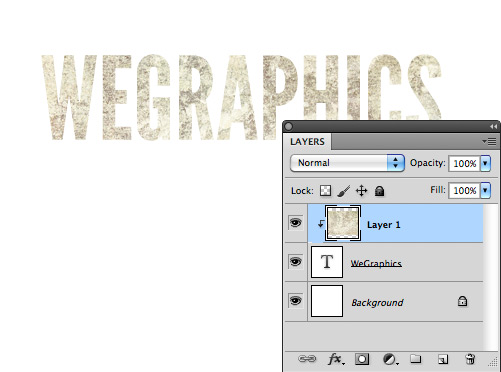 The is a great practice as both layers remain in tact and can be edited separately.
 From here you can scale by entering a percentage value. A shortcut is to click the chain between these fields so that your values are locked together, therefore, keeping your object in correct proportions.
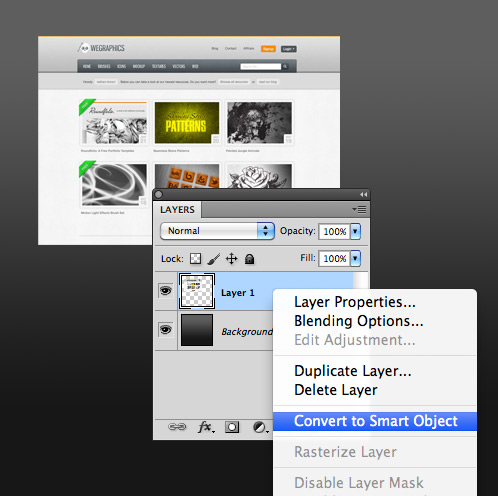 Now let's apply a Gaussian Blur [ Filter | Blur | Gaussian Blur ]. You'll notice that the filter is applied as a "Smart Filter". Meaning the original layer is still in tact, and the filter is applied as a mask. That mask can be selected and you can then paint on the canvas where the filter should be applied. Pretty cool.
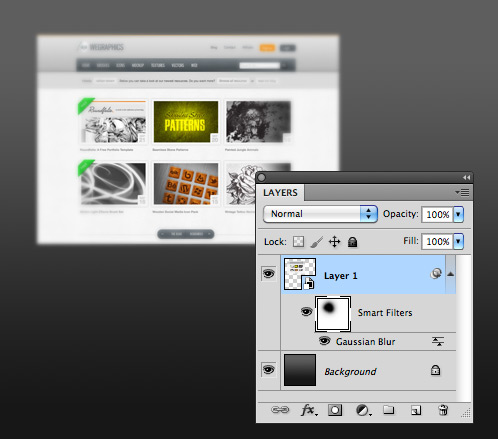 But wait... There's more. Now I want to replace that layers content with something new. To do so, double click the Smart Objects layers thumbnail within the Layers Palette. The content will open in a new window. From here you can edit it, or replace it all together with something new.
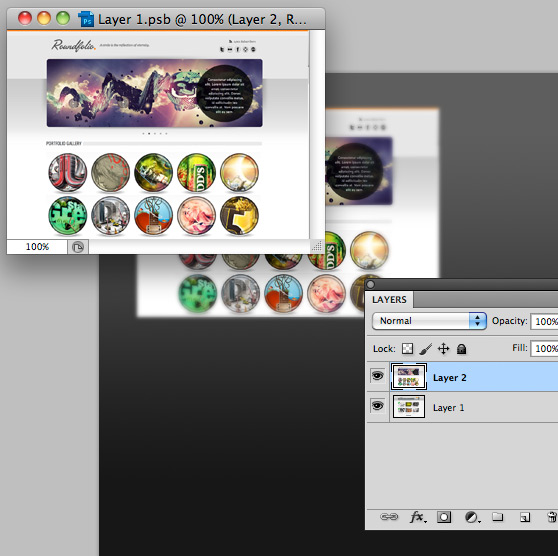 This is an incredible tool that allows flexibility that was not available in previous versions of Photoshop.
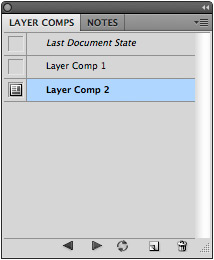 Once you get used to using Layer Comps you'll find you can't lice without them.
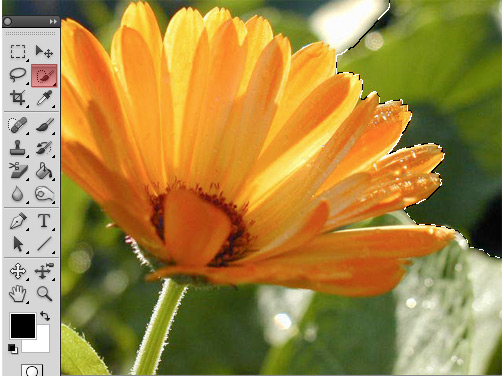
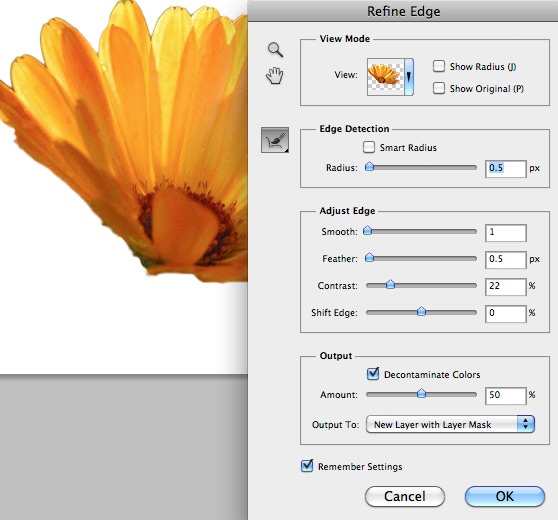 What's really cool about this feature is that you have complete control over your selection, and can preview it using several view modes in real time. Fine tuning your selections has never been easier.
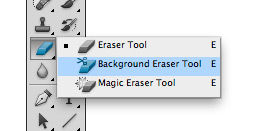 Once selected there are three options in the top menu bar for selecting how the tool performs.
Sampling Continuous - The tool continuously samples color to be removed as you paint.
Sampling Once - Erases only the color you sampled by [ Opt + clicking ] the color before erasing.
Sample Background Swatch - This is my favorite setting as it erases the color currently set as the background swatch.
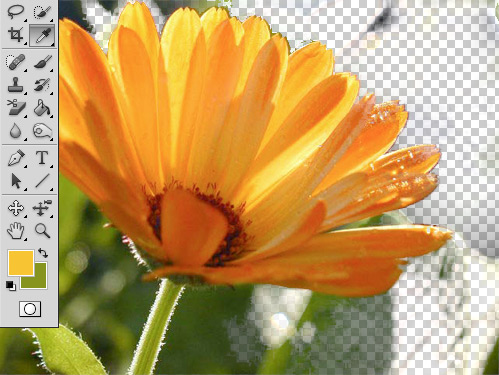
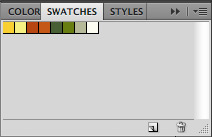 You can add new colors to the Swatches Palette by simply clicking anywhere in the gray area or by clicking the new swatch icon. A dialog will appear allowing you to name the swatch. The chosen color will be whatever is set as the foreground color.
Once you have your collection of swatches you can save them from the pull down menu at the top right of the palette. Now your client's brand colors are just a click away.
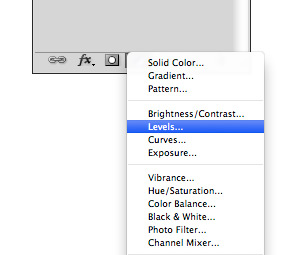
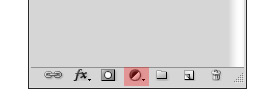 A menu appears with adjustment options. Let's select "Levels" for this example.
 The a new layer appears above all others and the adjustment panel opens. Here you can select your levels and all layers below the adjustment layer will be effected.
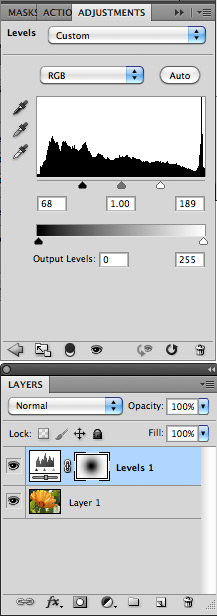 Also note that the adjustment layer has a mask so you can use the brush tool to determine where the effect is applied.
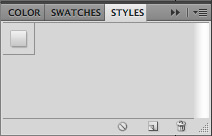
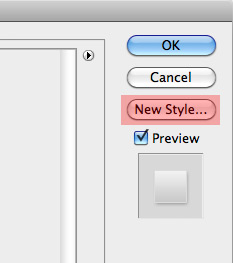 Your style will be saved to the Layer Style palette. Once you have a collection of styles you can save them from the drop down menu in the top right of the Layer Style palette.
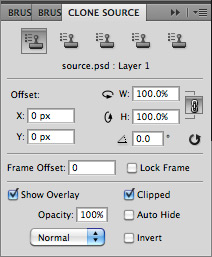 Choose a clone source icon at the top of the panel (1 through 5) and then [ Opt + click ] anywhere in the document to set that source. Choose another icon and do the same.
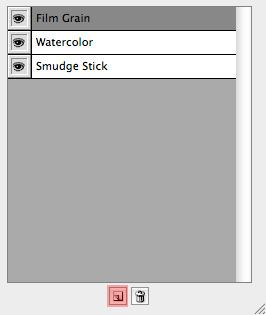
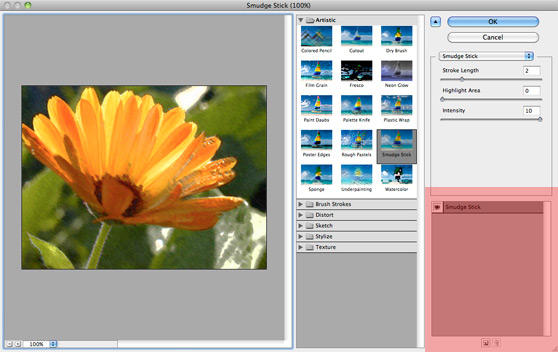 You can add new effect layers from the icon at the bottom. You can even rearrange layers for different effects. The effects can also be reedited by selecting the corresponding effect layer.
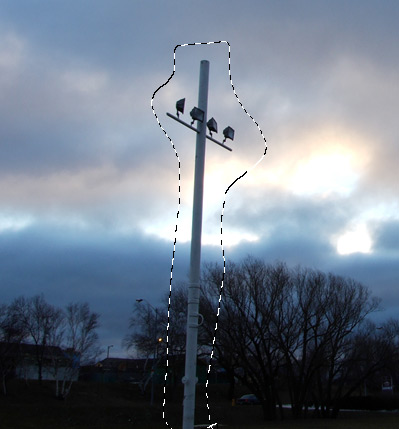 Make a loose selection around the pole. It doesn't have to be perfect, just quick. That's one of the benefits of Content Aware.
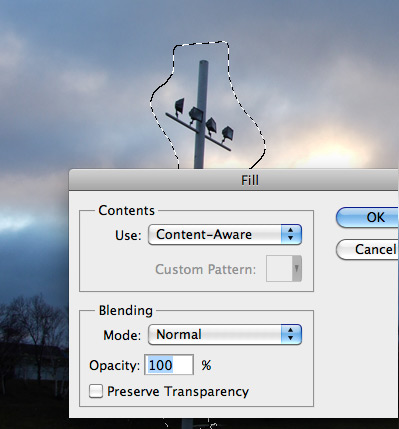 Next choose [ Edit | Fill ] and make sure that "Content-Aware" is selected for Use:
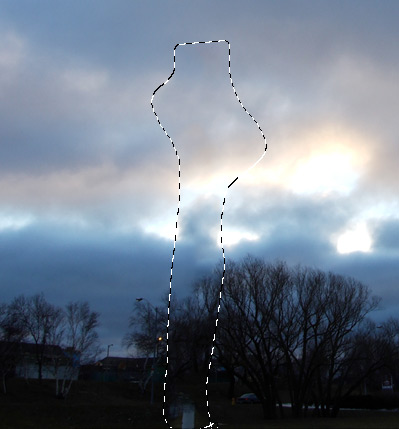 The features effectiveness depends greatly on the image you're editing, but regardless, it's quicker than relying completely on the Clone Stamp, which would have taken A LOT longer. Typically you will have to do a little bit of of touch up here and there, but over all Content-Aware is a very powerful and useful time-saving tool.
Keyboard Shortcuts for Layer Manipulation
Note: These shortcuts refer to the "Cmd" key on a Mac keyboard. For PC users substitute the "Ctrl" key in it's place. Create a new layer As your working in PS adding layers to your canvas is essential. It's possible that you may add dozens of layers in one piece. You can save a number of clicks with the following shortcut. New layer with dialog box: [ Cmd + Shift + N ] New layer without dialog box: [ Cmd + Shift + Alt + N ] Zoom in and out zooming in and out is a necessity when designing a piece with lots of detail, or working on a large print piece. Zoom in: [ Cmd + = ] Zoom out: [ Cmd + - ] Another useful zoom trick is to fit the artwork to your monitor window size Fit to window: [ Cmd + 0 ] Merge layers Sometimes it's a good idea to merge 2 or more layers into one to decrease your document size ore the amount of layers your working with. To merge layers: [ Cmd + E ] Group Layers Select the layers that you would like to group together [ Cmd + click ]. To group those layers: [ Cmd + G ] Create a new layer that contains all visible layers This can be an excellent tool for many reasons. Sometime you may want to experiment with a flattened file without actually flattening your file. To create a new layer containing all visible layers: [ Cmd + Alt + Shift + E ]Did you know?
Photoshop is not limited to its own built in shortcuts. You can also build your own shortcuts by pressing [ Ctrl + Alt + Shift + K ] or go to [ Edit | Keyboard Shortcuts ]
Using Actions to Personalize Your Work Flow
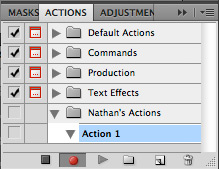
One of the most useful productivity tools in Photoshop are Actions. "What are actions?"? you might ask. Well imagine something that you do over and over in PS that involves a series of clicks that are repetitive, meaning you have to do the same thing over and over to achieve the result you are after. Well, why not record those steps into an action and run it from one click, or maybe even a keyboard shortcut? A Further Look Let's have a look at the actions that are built into Photoshop. Load the Actions Palette from [ Window | Actions ]. Then load the Production actions collection from the palette's pull out menu. There is a variety of simple production actions in this collection. It will give you a good idea of how actions can be used to speed your production. For example, notice the first action in the set. "Letter Canvas 150"? Creating an 8.5x11 canvas is something that you probably do often, and here is a handy little action to preform those steps for you to keep from having to do a receptive task over and over. The possibilities of actions are essentially endless.
 Creating Your Own Actions
It's simple to do so, just click the New Action icon at the bottom of the palette. Once the action is created, the record button will light, also at the bottom of the palette. From there Photoshop will record each function you preform until you press the stop button.
 For example: Let's say that you always convert you art to a size of 800x500 and add a water mark logo and save as a JPG for the web. This is something that you could easily record to an action and do with the click of a button.
Did you know?
You can convert your Actions Palette to display buttons. Select "Button Mode" from the palette's pull out menu. Now you can run actions by simply clicking the appropriate button.
500+ Files at Once with Batch Processing
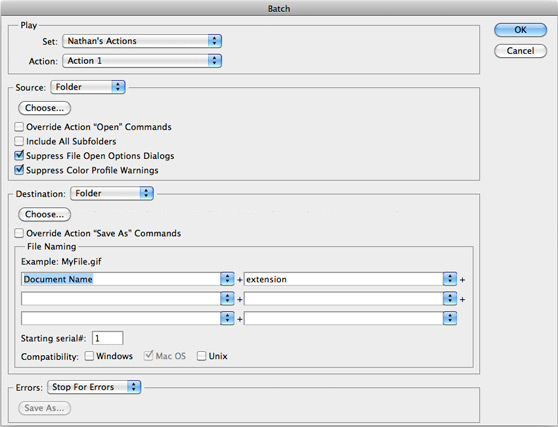
Batch Processing is an incredibly powerful tool. Imagine you have a directory of 500 images that all need to be sized down to 100x200 pixels and converted to black and white and then saved as a Gif. Well, we just learned that we can create an action to do that for us with the click of a button. Given the size of this task it will still involve opening 500 images and clicking that action 500 times, right? Wrong! We can use Batch Processing to open all of those images one by one, perform the action and then save and close each file. What might take you several hours will only take Photoshop a few minutes to do. So you've got some time to go grab a cup of coffee. Explore the Batch Processing options under [ File | Automate | Batch ]
Did you know?
You can use Batch Processing to save a copy of your files to a new directory leaving the original files untouched. Simply select a destination directory from the Batch Processing window.
Using Tool Presets to Save Your Best Brushes
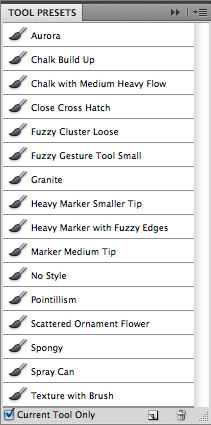
If you spend the time to get your tools set a specific way, why not save those settings as a Tool Preset? For example, you've spent the time to create a scatter brush from your favorite WeGraphics water color brush set. Instead of adjusting those settings each time you want to splatter paint, you can open the Tool Preset palette from [ Window | Tool Presets ] and click the new Tool Preset icon at the bottom of the palette. Once you have a collection of presets you can then save them for use later. Click "Save Tool Presets" from the palette's pull out menu. You can organize your presets by tool, or by type of project. Photoshop also comes packed with several collections of tool presets. Just select the brush tool to see the presets for that tool. Load more by clicking the pull down menu from the presets panel.
Keyboard Shortcuts for Handling the Canvas
Multiple Undos Typically in most software packages [ Cmd + Z ] will undo multiple times, but in Photoshop it only undos 1 time and then does a redo if pressed again. For multiple undos: [ Cmd + Alt + Z ] Switch Canvas / Document Windows This is a great tip if you are working from multiple windows within PS. To switch between documents: [ Cmd + Tab ] The Move Tool Here's an easy one to remember. When working on a large canvas or moving artwork that you have zoomed in on, the Move Tool is essential. Toggle the Move Tool by holding down the [ spacebar ] or switch to the Move Tool: [ H ] Show / Hide Rulers and Guides Using the rulers and guides are a necessity when it comes to precise placement of objects in your document, and at times you need to toggle them to view your work without these distractions. Toggle rulers: [ CMD + R ] Toggle guides: [ CMD + ; ] Rotate View If your working on a tablet it can make the feel more natural to rotate the view of your canvas/document to a 45 degree angle. Rotate view: [ R ] Cycle Through Open Documents [ Ctrl + Tab ]History Snapshots for Fast Experimentation
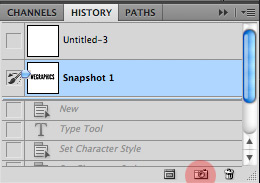
If you design like I do then you're probably familiar with experimentation. Let's say you have a project near completion but you want to try a few extra filters or adjustments to see how it would look, but you might not be happy with the results and want to revert back to where the piece is currently. Before starting your experimentation simply click the small camera icon at the bottom of the history palette. This creates a snapshot of the document's current state within the History Palette. You can create as many snapshots as you want to compare the artwork at different states.
Did you know?
Snapshots are not saved with the document. They only work within the current work session, so be sure to save your artwork at the desired snapshot before closing.
Creating Seamless Art with Patterns
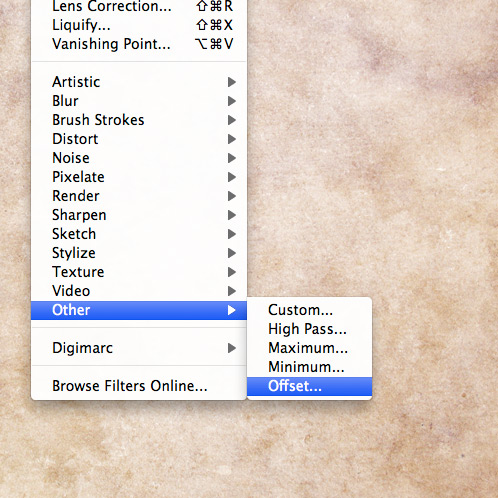
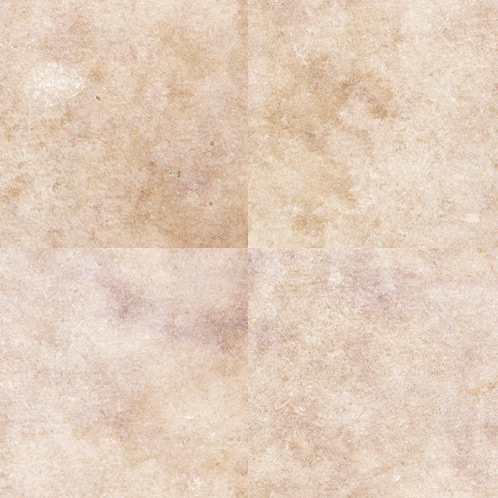
Creating patterns in PS is an often overlooked feature. You can do some very powerful things utilizing pattern layers. Imagine creating a grunge background pattern that expands to fit any sized document window. It can be done with ease using seamless patterns. Creating and Defining Patterns When creating a pattern it's a good idea to keep seamless designs in mind. But not all things in nature are seamless, so you have to use a bit of ingenuity to make it work. The best way to create a seamless pattern in Photoshop is by using Filter | Other | Offset. Let's say your canvas is 500x500 pixels, so your offset would need to be 250 pixels vertical and horizontal. After clicking "OK" for the offset you can then remove the seam lines with the Clone Stamp [ S ] or the Healing Brush [ J ].
 To define the pattern click Edit | Define Pattern. The pattern will then be accessible from the Pattern Palette when you select the Paint Bucket Tool [ G ] or when you create a new Pattern Layer from the Layers Palette.
One Click Art with Photoshop Brushes
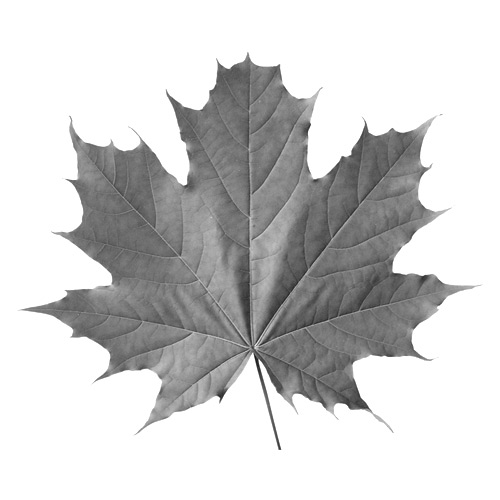
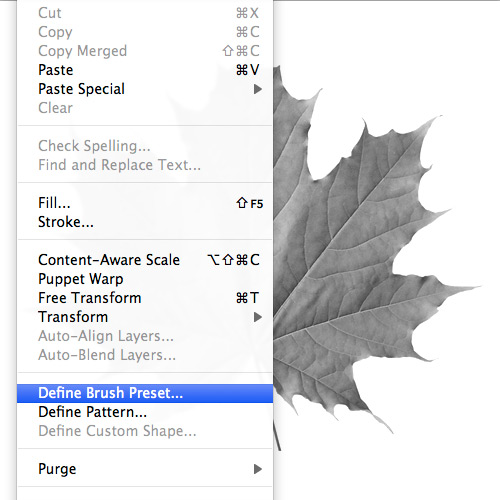
Creating my own brush sets is my favorite way to customize my workflow in Photoshop. You can do some incredible things with the click of a single brush. Brushes can be created from virtually anything. The door is wide open for creativity regarding this aspect of PS. Creating and Defining Brushes There are very little restrictions when creating brushes. The only thing you have to keep in mind is size. The max size for a brush is 2500x2500 pixels and the result is black and white. I typically create a grayscale canvas that size and work within that boundary. Try scanning objects and taking photos as source material for brushes. Once you have a brush laid out, click Edit | Define Brush Preset.
 The brush will then be accessible from the brushes palette.
 Custom brushes are a very fun tool. I encourage you to experiment and find a style of brush that you would find useful within your artwork.
Adding Flexibility with Custom Vector Shapes
Custom Shapes are an incredible tool, that is somewhat hidden within PS. To view them you need to select and hold the mouse down over the Shape Tool in the Tools Palette. A drop down will appear and the last option is Custom Shapes. Shapes are loaded similar to patterns. There is a drop down in the top tool bar that show all of the shapes currently loaded.
 Photoshop comes with several collections of built in shapes. You can load these from the small arrow at the top of the Custom Shape drop down. Load some of the preset shapes and experiment.
 You can also create your own custom shapes from your vector files. Simply paste a vector from illustrator as a Path in Photoshop. Then with the Pen Tool [ P ] selected Ctrl + click on the Illustrator path and select Define Custom Shape from the drop down. Bam! Your shape now appears in the Custom Shape drop down menu in the top tool bar.
Keyboard Shortcuts for Brushes and Tools
Default Colors and Switch Colors Switch back to default black and white, or switch the foreground and background colors. Default colors: [ D ] Switch Colors: [ X ] Brush Tool and Eraser These are two of the most widely used tools for basic illustration. Brush Tool: [ B ] Eraser Tool: [ E ] Brush Size Change the size of your brushes while working. This is an incredibly useful tool that can save a lot of clicks. Increase brush size: [ ] ] Decrease brush size [ [ ]Using Clipping Masks to Show/Hide a Portion of a Layer
I think that clipping masks are generally misunderstood, but can be a very powerful tool when it comes to flexibility and non-destructive design. To use Clipping Masks you need two layers the bottom most layer being the clip (or portion that is viewable) and the upper most layer being the mask (or portion that is overlaying the clip). The mask can also be multiple layers. A good example is a text layer acting as the clip and a texture being set as the mask. The image is layered above the text and then set to a Layer Mask by [ Ctrl + clicking ] on the upper layer and choosing "Create Clipping Mask" from the pop menu. To release the mask [ Ctrl + Click ] the mask layer again and choose "Release Clipping Mask".
 The is a great practice as both layers remain in tact and can be edited separately.
Did you know?
You can add layer effects to the clip layer for an extra touch of design. Try drop shadows and strokes!
Scaling Art and Keeping Proportions
Scaling the size of artwork is a common task in Photoshop. So common that you probably don't even think about it. There are a couple of methods to keep in mind for keeping your artwork in proper scale, or width to height ratio. I often times see photo within a document that have been scaled improperly and as a result appear stretched either vertically or horizontally. When scaling an image [ Cmd + T ] hold the shift key down so that your image stays to scale. A simple trick that is essential, and makes your work appear more professional. An alternative method for scaling an object is to use the top tool bar. It appears when you select the scale tool or press [ Cmd + T ].Use Smart Objects and Filters for Non-Destructive Designs
This is a new PS feature starting with CS4, and is an excellent way to maintain your layers while still adding effects and even replacing the layers content! Yes, you heard right, you can even replace a Smart Object with something completely new and the effects and edits of that layer will remain separate and will apply in the same manner to the new layers content. A Further Look Let's try an example. Say we have a layer that contains an image. First we convert it to a Smart Object by [ Ctrl + clicking ] on the layer and choosing "Convert to Smart Object". Pretty simple, right? Now let's apply a Gaussian Blur [ Filter | Blur | Gaussian Blur ]. You'll notice that the filter is applied as a "Smart Filter". Meaning the original layer is still in tact, and the filter is applied as a mask. That mask can be selected and you can then paint on the canvas where the filter should be applied. Pretty cool.
 But wait... There's more. Now I want to replace that layers content with something new. To do so, double click the Smart Objects layers thumbnail within the Layers Palette. The content will open in a new window. From here you can edit it, or replace it all together with something new.
 This is an incredible tool that allows flexibility that was not available in previous versions of Photoshop.
Multiple Compositions with Layer Comps
Layer comps are an easy way to maintain alternative layouts in a single design file. This method of maintaining a design is much easier than managing multiple files of a single composition. To apply Layer Comps simply open the Layer Comps panel [ Window | Layer Comps ]. Once you have created a new layout within your document press the "New Layer Comp" icon at the bottom of the panel. This will record the document state. You are then free to continue editing. At that point you can refresh the current layer comp or create a new one. Once you get used to using Layer Comps you'll find you can't lice without them.
Masking with Quick Mask Mode
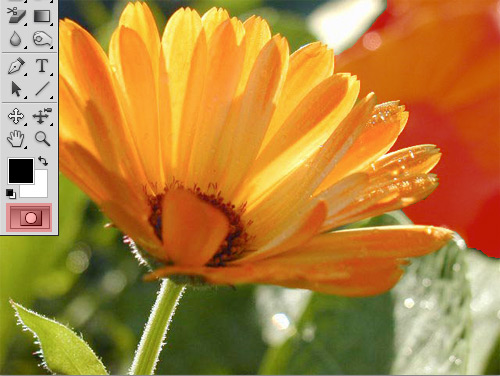
One of the most tedious tasks in Photoshop is making a selection from an image, or so you thought. Making selections can be as easy as painting on your canvas using Quick Mask Mode [ Q ]. In QMM you can simply paint where you want your selection to appear. When you leave Quick Mask Mode your painted area will become a selection. QMM simplifies the task of creating a complex selection.
Did you know?
While in Quick Mask Mode you can still edit your brush used for the selection area. Try adjusting the softness of your brush to select areas that are slightly out of focus within and image.
Masking Even Quicker with Quick Selection
If you want to make selections even faster, give the Quick Selection tool a try. This tool will select similar surrounding colors as you paint with the tool on your canvas.
How to Refine the Edges of Your Selections
Now that you've made your selection you may be asking "What about the jagged line or hard edge created from my selection area?". In steps the Refine Edge feature. With a selection made [ Select | Refine Edge ]. A new window appears with several options for adjusting the edge of your selection. What's really cool about this feature is that you have complete control over your selection, and can preview it using several view modes in real time. Fine tuning your selections has never been easier.
Did you know?
You can even output your selection to a new layer with a layer mask? Non-destructive design at it's best!
Using the Background Eraser Tool to Quickly Remove Background Color
Wouldn't it be nice to erase only the background of your image while leaving the foreground intact? Well it's possible using the Background Eraser Tool. Select the Background Eraser Tool from the Eraser Tool drop down. Once selected there are three options in the top menu bar for selecting how the tool performs.
Sampling Continuous - The tool continuously samples color to be removed as you paint.
Sampling Once - Erases only the color you sampled by [ Opt + clicking ] the color before erasing.
Sample Background Swatch - This is my favorite setting as it erases the color currently set as the background swatch.

Did you know?
You can set the foreground color swatch to a color that you want to leave in tact within the image then select "Protect Foreground Color" in the top tool bar for the Background Eraser Tool.
Keyboard Shortcuts for Handling Selections
Add/Remove from a Selection Once you've made a selection sometimes it's necessary to add to that selection without starting over from scratch. Likewise when trying to remove a portion of that selection. Add to a selection: [ Shift + Mouse Drage ] Remove from selection: [ Alt + Mouse Drag ] Constrain Marquee You can keep the Marquee tool confined to a perfect square or circle. Proportional Shape: [ Shift + Drag ] Draw Marquee from Center Instead of dragging your selection from the edge. Draw selection shape from center: [ Alt + Drag ] Draw Marquee from Center and Constrain The above two shortcuts at the same time. [ Shift + Alt + Drag ]Saving Color Schemes Using the Swatches Palette
So you've created a logo and color scheme for use throughout all branding materials for a particular client, and you will need access to those colors across multiple documents. Why not save that color scheme as a set of swatches using the Swatches Palette. It's pretty easy. You can add new colors to the Swatches Palette by simply clicking anywhere in the gray area or by clicking the new swatch icon. A dialog will appear allowing you to name the swatch. The chosen color will be whatever is set as the foreground color.
Once you have your collection of swatches you can save them from the pull down menu at the top right of the palette. Now your client's brand colors are just a click away.
Non Destructive Editing Using Adjustment Layers
Adjustment layers are one more excellent example of non-destructive design, leaving your original image perfectly intact. You can add adjustment layers by using the icon at the bottom of the layers palette. A menu appears with adjustment options. Let's select "Levels" for this example.
 The a new layer appears above all others and the adjustment panel opens. Here you can select your levels and all layers below the adjustment layer will be effected.
 Also note that the adjustment layer has a mask so you can use the brush tool to determine where the effect is applied.
Saving Your Layer Styles for Use in Other Documents
Often times you will create buttons in PS using layer styles. Those buttons my contain a gradient overlay, a stroke, and a subtle drop shadow or outer glow. That's a lot of clicks to create each button, especially across multiple documents. You can easily save all of your styles to the Styles Palette for future use. Once you've created a button with various styles click the "New Style" button within the Layer Style window. Your style will be saved to the Layer Style palette. Once you have a collection of styles you can save them from the drop down menu in the top right of the Layer Style palette.

Using Multiple Sources with the Clone Stamp
Everyone is familiar with the Clone Stamp Tool and how it can be used to paint using a clone source within a document. But I bet you didn't know that you can paint using multiple sources. Up to 5, in fact. And you can switch between those sources using the Clone Source Panel. The sources can be from multiple layers or even multiple documents. Choose a clone source icon at the top of the panel (1 through 5) and then [ Opt + click ] anywhere in the document to set that source. Choose another icon and do the same.
Applying Multiple Filters at Once With Filter Gallery
Sometimes the hardest part about applying filters is deciding which filters to apply. The task is made abundantly easier using the Filter Gallery. [ Filter | Filter Gallery ] From this new window you can apply multiple effects, edit and remove them, and experiment to your hearts content before committing. Pay close attention to the bottom right of this window. You can add new effect layers from the icon at the bottom. You can even rearrange layers for different effects. The effects can also be reedited by selecting the corresponding effect layer.

Let Photoshop Do the Work with Advanced Content-Aware Fill
Content Aware Fill is a new option for removing something in an image without using the old methods of Clone Stamps or Healing Brushes alone. Start out with an image that has something to be removed. I have an image with a telephone pole blocking the view of the cloudy sky. Make a loose selection around the pole. It doesn't have to be perfect, just quick. That's one of the benefits of Content Aware.
 Next choose [ Edit | Fill ] and make sure that "Content-Aware" is selected for Use:
 The features effectiveness depends greatly on the image you're editing, but regardless, it's quicker than relying completely on the Clone Stamp, which would have taken A LOT longer. Typically you will have to do a little bit of of touch up here and there, but over all Content-Aware is a very powerful and useful time-saving tool.


